Coding a Document
Coding a document in the customizable Coding section records coding decisions about a document.
To code a document
- Open a document in the Document Viewer.
- Depending on the type of document, select the view you prefer: Text, HTML, Images, NSR, or Media.
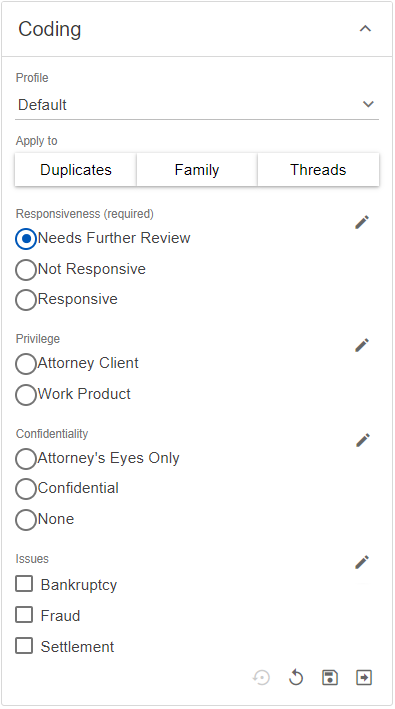
- In the Coding pane, click the Coding section drop arrow.
- Select the Profile for the coding.
- If you choose select Apply to to automatically propagate your coding decisions to any of the following relational items (as displayed in the Related Pane):
 Family: Apply coding decisions to all family members.
 Duplicates: Apply coding decisions to all duplicate documents.
 Threads: Apply coding decisions all documents in the thread.
 Near Dups: Apply coding decisions to all near duplicate documents.
- Select the remaining options and check boxes reflecting your coding choices.
- After coding a document, click one of the following:
| Click: | To... |
|---|---|
 APPLY PREVIOUS APPLY PREVIOUS |
Apply the coding selection of the most recently saved document. |
 RESET RESET |
Undo any coding changes you have made without saving. |
 SAVE SAVE |
Submit your coding selection and remain at the current document. |
 SAVE/NEXT SAVE/NEXT |
Save your coding selection and load the next document on the Document Viewer. |
To edit a coding field
- Open a document in the Document Viewer.
- In the Coding pane, click the Coding section drop arrow.
- Click the Edit icon
 for the coding field you want to update.
 - Use the Edit Field dialog box to view field settings and make the following changes:
- Name: Edit the name of the coding field.
- Privacy: View the level of privacy - Public, Firm, or User.
- Custom Field Format: View the field format.
- (required): Select to indicate field must be completed.
- To delete a tag, click the Delete icon
 for the tag field you want to delete and on the Delete Confirmation dialog box, click Delete.
 - To update a tag, click the Edit icon for the tag you want to update, then on the Edit Tag dialog box, update the Name and click Save.
- To add a tag, click the Add Tags icon
 , then on the Add Tags dialog box, type the Name and click Save.
 - Select the remaining options and check boxes reflecting your coding choices.